The Key to Slackware__________________________________________________________________________________
// This tutorial created by lucid.
// Official tutorial located at evilzone.org for Evilzone
//
lucid@evilzone.org::In This Tutorial- Partitioning
- Installing and configuring
- Installing GRUB
- Post-configuration
- Installing and configuring LILO
- Outro
::What You Will Need- Slackware 14.0 LiveUSB or CD(although this could be done on other *nixes)
- A small flashdrive
- Confidence tweaking your system and editing configs
- To give a shit about the topic at hand
::Let's Get Started!
What's up nerds. I'm glad to have you reading my tutorial. Hopefully you'll get something good out of it. First off, some background. I got this idea recently when I decided that I wanted to, at least temporarily, end my year and a half career using Arch Linux, and explore one of the other major players; Slackware. I figured I'd start my Slackware journey with a bang and jump right into trying out some cool little hacks. The particular little hack this tutorial is about is installing the bootloader on a separate USB. Without the bootloader you can't boot into your system, and since the bootloader is on a flashdrive you must have this flash drive plugged in, in order to boot into your system. Much like a key to a house or car. I've heard of people doing this before using Arch, but to date I have yet to see one tutorial on it(not that I really looked very hard) and I've never heard of anyone doing it in Slackware. Many of the hacks and cool things I've done over the past couple years have been things that I know are possible, and have definitely been done before. Normally I'm following what someone else has already done. I wanted to do something different. I wanted to try something that I wasn't necessarily sure would work, and that I had no directions or guidance on. Something that was my own work and I figured out using what I already know, and goddamnit it worked so here I am to share it with the most evil place on the web.

So, here we are. Just follow along and I'm sure this will work for you too. Hopefully you have experience using Slackware, but it's not completely necessary as I successfully did this and I've never used Slackware beforehand. Now, I call this tutorial the Key to Slackware because that is essential what I've created. What we are basically doing is installing a bootloader onto a flashdrive, instead of on your HDD. The desired effect is that your computer won't even load if the flashdrive is not plugged in. Much like a door key. Now, without further delay, lets pop in our Slackware LiveCD and get started.
::PartitioningIt is normally recommended that you would use cfdisk for partitioning, but here we are going to use fdisk because it is easier to partition other disk drives with fdisk. So, login as root and run:
fdisk -l
What does your partition scheme look like? Seeing that I'm running a dual-boot, here's what mine would basically look like before anything has been installed:
/dev/sda1        NTFS(windows boot)
/dev/sda2        NTFS
/dev/sda3        NTFS(Sharing between windows and linux)
Still have that flashdrive right? Make sure it's plugged in, the run this command:
fdisk /dev/sda
The command you are looking for is 'n'. This creates a new partition on /dev/sda. Set this partition as primary on /dev/sda4. You may accept the default options. Once you are done then hit the 'w' button to write the changes to disk. Next we will run:
fdisk /dev/sdb
Again, hit the 'n' button to create a new partition on the USB. Choose /dev/sdb1 as the drive assignment. Make this primary as well and you may accept the default options. Unlike with the last step, we have one other command you will need here. The 'a' button makes the partition bootable. Write the changes to disk. Run fdisk -l again. It should look like this:
/dev/sda1        NTFS(windows boot)
/dev/sda2        NTFS
/dev/sda3        NTFS(Sharing between windows and linux)
/dev/sda4        ext4        /

/dev/sdb1        ext4        *(bootable)
Wonderful. You've essential molded the key to the door. Let's move on.
::Installing and ConfiguringNow that everything has been partitioned, the next thing we do is actually set up and install Slackware. To get this going run the command:
setup
You will see an interface that looks like this:
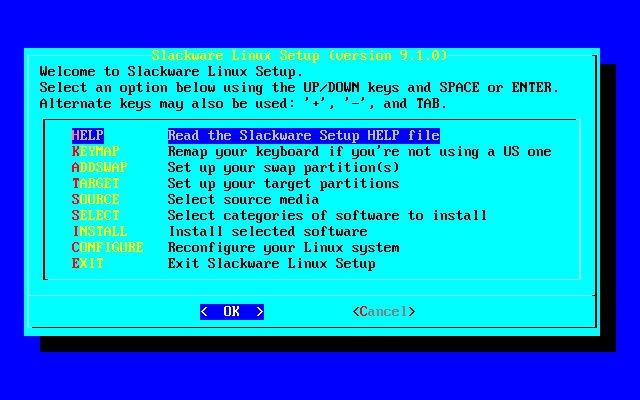
Now, we can all skip the first two options in the menu, and I always skip creating a swap partition because:
- I never need it
- Security
Obviously you can choose to do whatever you want. Creating swap won't affect this tutorial at all.
TARGET:We have now arrived at the TARGET option in the Slackware install menu. Here, you simply choose where you want your partitions mounted. The /dev/sda4 partition should be mounted as root. Be sure to mount /dev/sdb1 as /boot. You can change these settings if you want but for the sake of following the rest of the tutorial you might want to keep these the same. Both partitions should be ext4. I also choose to mount /dev/sda3 on /mnt/share, but that's just a personal preference. If I remember correctly that's all we need to do here.
SOURCE:Here you can just auto-detect your LiveCD. Nothing too special in here. You should be at a screen that looks something like this:
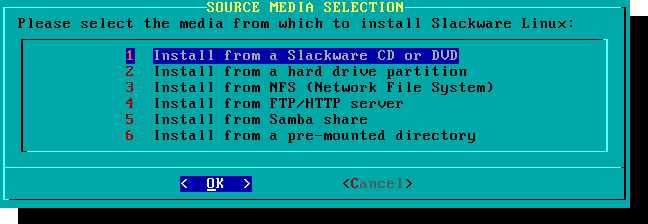
Just pick option one unless you have some other way of installing. Then auto-detect your CD or USB and lets move on.
SELECT:If you want, you can choose to install certain categories of software.

I usually uninstall KDE. Do whatever you want. Just don't unselect the base install like an idiot.
INSTALL:Moving right along, we now find ourselves at the INSTALL category. So if you are following me you should be here:
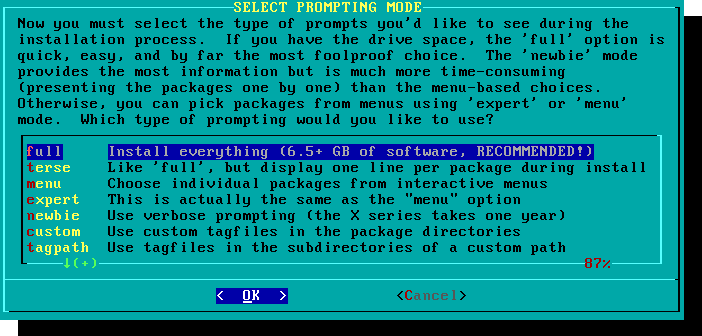
I normally choose menu because I'm still in Arch mentality and I want as few things on my system that I don't need as possible. You can choose full install if you wish. If you choose to uninstall packages using the menu option I have no specific recommendations, just that you don't uninstall something system necessary. Within an hour, the install should be completed. At the end of the install it will ask you if you would like to create a boot disk.
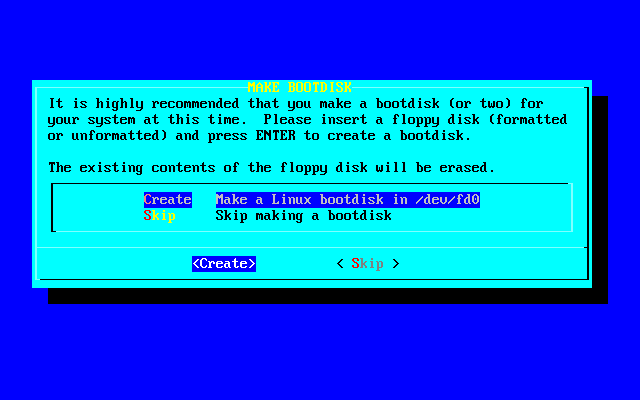
I skip this step. You should do the same. Now, you should be ready to move into the final steps.
CONFIGUREAlright then. Configuring has commenced. Here you will configure your network, password, turn off or on desired startup services, tryout some customs fonts if you wish, and you have the option to install LILO. If you choose, you can also create a new user. However, if you are one of those headstrong 1337 hackers then you will just use your root account. I can't stop you.
Keep in mind, you do not need to install LILO if you will be doing this with GRUB. I'm aware that LILO is more Slackware appropriate, but at the time of writing I couldn't get this to work with LILO. Thus, we are discussing GRUB. I will cover LILO later on. I should add that I recommend you do this with LILO, as it's much simpler and you don't have to install dependencies like you will with GRUB. Plus it's much lighter then GRUB.
I'm not going to get too into detail about all of the steps, because so far all we've really done is a basic Slackware install(given a few small tweaks) and I'm going to expect that you are able to figure this much out on your own. Installing Slackware is very easy and straightforward, and if you have trouble with that then, well, maybe you should just go play sports..
::Installing GRUBOnce you've configured your network, created a new user, skipped LILO, and done any other necessary steps here then you are technically done installing Slackware. Unfortunately for you, if you were to reboot right now you'd be greeted with a rather smelly, ugly boot error screen. Or, depending on your BIOS and your computer setup, it'll just boot you into Windows(assuming you've dual booted). So after exiting the setup, don't reboot. Just switch to a new TTY and chroot into your installed system.
Actually, before you do anything else, refer to this link:
http://slackbuilds.org/repository/14.0/system/grub2/This is the necessary slackbuild that you will need. Before to search the website for the required dependencies. Also, be sure to download this package as well:
http://slackbuilds.org/repository/14.0/perl/locale-gettext/You can use wget or you can do what I did which is to download them in my Windows partition and move them over to the root partition. Either way, just make sure you install them in this order:
locale-gettext
help2man
gnu-unifont
os-prober
grub
Notice: Be sure to chroot into your newly installed system before actually installing any of these packages!Run these commands to ensure your in your actual system:
mkdir /mnt/chroot
mount /dev/sda4 /mnt/chroot
chroot /mnt/chroot /bin/bash
If you don't know how to install a slackbuild, just navigate to the HOWTO section of the Slackbuild website. Basically all you do is download the slackbuild, un-tar it, read the .info file for the download link, wget the source, move it into the un-tarred directory. Then you run:
chmod +x whatever.SlackBuild
./whatever.SlackBuild
Finally, you'll install the package that was created in /tmp using:
installpkg long-package-name-3.24-1-SBo.tgz
There may be some doinst.sh package or some other post-config script you need to execute. Do this for all the packages. Once you get to GRUB be sure to take a breather...... Ok, done breathing? Now, install GRUB in this manner:
tar -xzf grub2.tar.gz
mv grub-2.00.tar.xz grub2
cd grub2
ARCH=x86_64 ./grub2.SlackBuild
installpkg /tmp/grub-2.00-x86_64-SBo.tgz
Assuming it all went well, you have one final set of commands to run in order to actually install the bootloader to the USB.
mount -v -t ext4 /dev/sdb1 /boot
mkdir /boot/grub
grub-mkconfig -o /boot/grub/grub.cfg
grub-install --force /dev/sdb
This ensures that /boot is where the flashdrive is mounted and that GRUB gets installed in the right place. GRUB get's scared sometimes so:
grub-install --force --target=i386-pc --recheck /dev/sdb
Might be necessary in order to urge it along.
::Post Install ConfigurationNot much really needs to be done here. Namely there is three important things that needs to be done. First off you should review your grub.cfg. Be sure that it is set to load the right disk drive. You should also edit your /etc/fstab. Be sure to add the 'noauto' option to /dev/sdb1. This way you can just yank the key once you've logged in. I also gave it the rw option like so:
/dev/sdb1 /boot ext4 rw,defaults,noauto 0 1
Ok, perfect. Now we can finally restart. Once you do, enter the BIOS and set boot option number one as the Slackware key(flashdrive). You can either have the second option boot the HDD second, or you could disable it. I've disabled everything except boot option one being the flashdrive. This way, if it's not plugged in, you can't get into my computer at all.
UPDATE::::Installing and configuring LILOI recently discovered how to do this with LILO. Now that I know how to do that, it's become the way I prefer. With GRUB, you have to install a bunch of packages after the install before actually installing grub. As it turns out, using the LILO method is much simpler. I'm going to keep the GRUB section in because knowledge is power and many people prefer GRUB. Also it's a good way to learn to manage packages while installing your new Slackware distro.
There really isn't much difference between the two. As it goes you can follow the tutorial to a tee all the way to finishing the initial Slackware setup menu. Making sure to partition in the same manner, and skipping installing LILO using the setup interface. I know it seems counter-intuitive to skip installing LILO when you are planning on using LILO, but just shut up and do it.
This time however, you will exit the setup and reboot. Once you've rebooted, enter the BIOS and boot back into your Slackware install media-- you won't be able to enter your system at all yet as you still haven't added a bootloader yet -- then mount your root partition and chroot into the system. Normally at this point you would probably want to start installing GRUB's dependencies in preparation for installing GRUB itself. Fortunately for us, we are using LILO, and LILO is installed already.

Another difference is that we won't be adding any LILO config files to the /boot parition on the removable media. LILO's only config file that I know of is located in /etc, and all you have to do to set this up is run:
liloconfig
Chose the expert setup option, but only answer the questions in the first option in the liloconfig menu labeled begin:
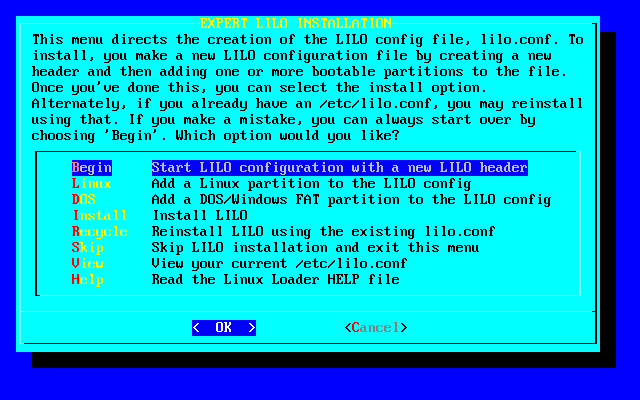
The default answers are ok here if I remember correctly and there's only a few questions.
DO NOT DO ANYTHING ELSE IN THE LILOCONFIG MENU!You are just trying to get /etc/lilo.conf created. Go down to the skip option. Feel free to check and make sure that the /etc/lilo.conf file was created and that it contains anything in the file. In fact, I recommend you do just to be sure. Now we come to a familiar command:
mount -v -t ext4 /dev/sdb1 /boot
Now, I like to cd into /boot, just to be sure although I am not really sure that it's necessary. In fact, I'm pretty sure I'm being silly by doing that but hey, fuck it. All you have to do now is run the command: lilo
At least, I think so. I'm writing most of this tutorial, including this part, from memory, so I may have missed something. Feel free to let me know if any of you try this and find errors. Anyway, assuming I'm not missing something, LILO will install to the flashdrive. In order to make this complete, we still need to do some configuring. Use your favorite editor and open up /etc/lilo.conf. Take notice of the top of the file:
# LILO configuration file
# generated by 'liloconfig'
#
# Start LILO global section
lba32 # Allow booting past 1024th cylinder with a recent BIOS
boot = /dev/sdb
Be sure that where it says:
boot =
You put /dev/sdb. It most likely will not be there by default. Scroll down. Take a look at this section of the file:
# End LILO global section
# Linux bootable partition config begins
image = /boot/vmlinuz
root = /dev/sda4
label = Slackware
As your root partition does not reside on your flash drive, and the root partition is where the operating system is(duh), you want this part:
root =
to point to your root partition. Which following this tutorial is /dev/sda4. As far as other configuring goes there's just /etc/fstab. You may edit this file exactly as you do when installing GRUB. Don't forget to set the boot order in your BIOS to the flash drive as you would with the other method as well. I believe that is all. Enjoy the simplicity of LILO on your removable boot key!
::OutroI would like to add that this was my first time using Slackware. I attempted this on my second install and aside from some googling and searching around I figured out how to do this on my own. I tried to make this tutorial as original as possible, and I hope too many of you haven't read an excess of tutorials like this one out there.
I believe that is all there is to it. If you have any questions feel free to ask them here. As well, feel free to PM me any mistakes you find. Hopefully some of you will find this an interesting enough idea and be able to do it successfully reading this tutorial. Good luck and happy hacking.
__________________________________________________________________________________
-lucid